Apple Pay on the Web using your own checkout page: decryption is done by Worldline and you use your own Apple account
You can integrate Apple Pay on the Web in your own checkout pages by following the instructions on this page. For this integration type you require an Apple Developer account to set up your Apple Pay processing domains, and your Apple Pay payment processing certificate. The private key that belongs to the certificate will be securely stored in our systems. We will use it to decrypt your customer's Apple Pay payment details and complete the payment.
You need to take care of the following steps:
- Enable Apple Pay at Worldline
- Create an Apple Developer account
- Set up an Apple Pay payment processing certificate
- Set up a merchant ID with Apple and create a merchant identity certificate with Apple
- Implement Apple Pay on the Web
- Send the payment token in the Create Payment API
Enabling Apple Pay on your account with us
First make sure Apple Pay is enabled for your account with us (merchant ID). To do so contact your account manager at Worldline who will work together with your implementation manager. They will be able to set the product up for you.
Create an Apple developer account
If you do not have one yet, make sure to set up an Apple Developer account. Have a look at the following page for instructions and more information about organisational Developer accounts.
Configuring Apple Pay on the web
In order to start accepting Apple Pay payments on your website, some configuration needs to be in place. Apple Pay requires setting up a payment processing certificate to protect your customers payment details. The certificate is used to encrypt their payment details, which creates the Apple Pay payment token. This token can be securely sent from you website to your server. The private part of the certificate will be used to decrypt the token to finish the payment.
Another security measure is that Apple only allows Apple Pay payments to be initiated from registered and validated domains. You should register the domains for you merchant ID on Apple's Developer Portal.
To setup your own Apple Pay payment processing certificate, sign on to our configuration center. In the configuration center, click Apple Pay in the menu and select “Add your details” for the option “Your payment pages + your Apple Pay certificate”. The following screen will appear.
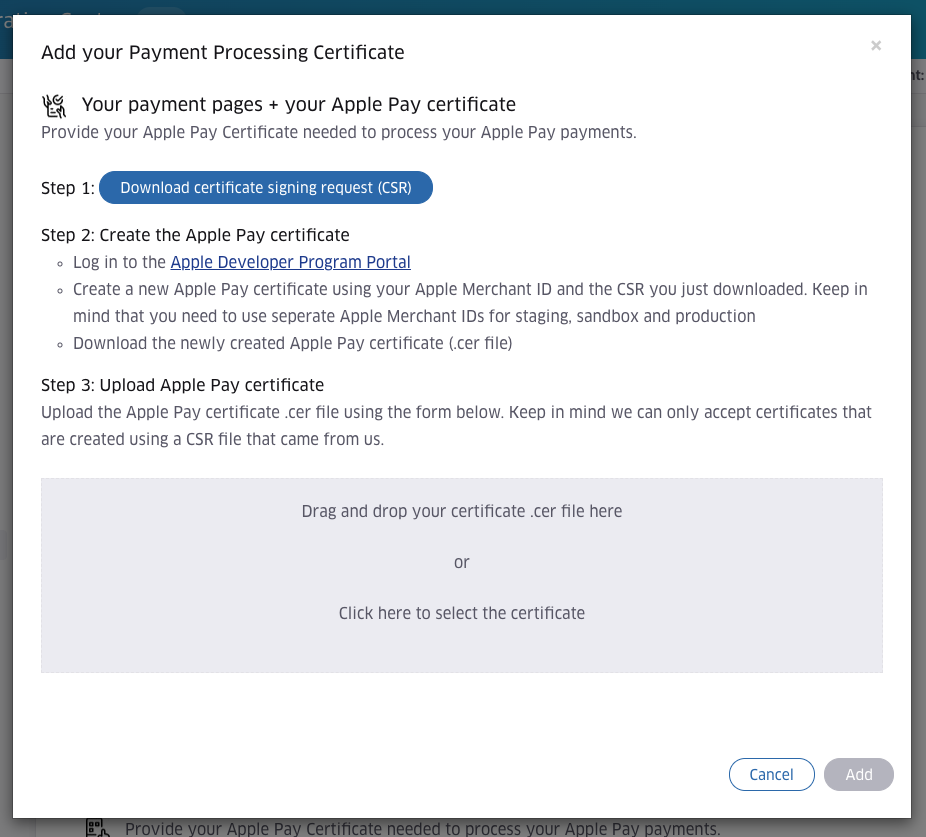
- Download the certificate signing request. While we generate the CSR that will be signed by Apple, the corresponding private key required for decryption, will be safely stored on our systems.
- Create the Apple Pay certificate. Follow the steps in the configuration center, and on Apple's developer portal.
- Upload the Apple Pay certificate. After having followed the steps in the Apple developer portal, you will have received a .cer file. This file should be uploaded here.
We will notify you by e-mail in case your payment processing certificate is about to expire. You will need to renew it yourself, following the steps described above to ensure you can continue processing Apple Pay on the Web transactions.
In the Apple Developer Program you can configure your merchant ID with Apple, create the merchant identity certificate as well as register your domain. Apple Pay on the web can only be used on domains that are registered and validated by Apple. Please consult Apple’s documentation on registering these domains. You will also need to whitelist the Apple Pay IP addresses for merchant validation and domain validation by Apple as specified in Apple's documentation.
Implementing Apple Pay on the web
The next step is to add code to your website to start accepting Apple Pay payments. This guide assumes that you will be using our JavaScript Client SDK in combination with Apple’s APIs where required. For information on how to initialise and work with our JavaScript Client SDK, please consult our Client SDK documentation. For detailed information on the mentioned Apple Pay APIs, please consult Apple’s official documentation.
1. Retrieve Apple Pay via the payment product(s) API
The first step is to use the JavaScript Client SDK to retrieve the Apple Pay payment product via the payment product(s) API. This will retrieve data that is required in the next steps, such as the supported networks. While retrieving the payment product details, the SDK will also perform a call to Apple's canMakePayments API, checking whether Apple Pay is available with the device and settings your customer is using. If this check fails, the Apple Pay payment product will not be returned by the SDK, indicating that Apple Pay is not available for the current transaction.
const APPLE_PAY_PRODUCT_ID = 302;

const paymentDetails = {
  totalAmount: 1,
  isRecurring: false,
  countryCode: 'US',
  currency: 'USD',
};

const paymentProductSpecificInputs = {
  applePay: {
    merchantName: 'MyMerchantName',
  },
};

try {
  // session is an instance of the Session object, which is the main entry point for the SDK
  const paymentProduct = await session.getPaymentProduct(
    APPLE_PAY_PRODUCT_ID,
    paymentDetails,
    paymentProductSpecificInputs,
  );

  // set payment product to the PaymentRequest to encrypt later
  const paymentRequest = session.getPaymentRequest();
  paymentRequest.setPaymentProduct(paymentProduct);

  // Apple pay is available, show the Apple Pay button
} catch (err) {
  // Apple Pay is not available, offer your customer another payment option to complete the payment
}
2. Show the Apple Pay button
Once you know Apple Pay is available, you can show the Apple Pay button to your customer. Please consult Apple’s documentation on displaying the Apple Pay button.
3. Initialise the payment
In order to collect your customers email address, shipping address, and potentially charge for shipping costs via Apple Pay, you have to integrate with Apple’s Apple Pay API directly. The JavaScript SDK can still help you with obtaining the supported networks, and preparing the payment details for the Create Payment API. Please consult Apple's documentation on ApplePaySession for details on the required and returned values of their API. The snippet below shows how to setup and complete a payment via the Apple Pay API.
Before the payment sheet will be shown to your customer, the onvalidatemerchant callback on the ApplePaySession object will be called. When this function is called, you are required to request an Apple Pay payment session via the url that is provided as a parameter.
/**
 * OnClick Apple Button callback handler
 * Creates an Apple Pay payment.
 */
function onApplePayButtonClick() {
  const paymentRequest = session.getPaymentRequest();
  const paymentProduct = paymentRequest.getPaymentProduct();
  const supportedNetworks = paymentProduct.paymentProduct302SpecificData.networks;

  // Initialise the Apple Pay Payment Request
  const applePayPaymentRequest = {
    supportedNetworks,
    // other payment values here...
  };

  // Try to support the lowest minimal version
  const minimalSupportedVersion = 1;

  const applePaySession = new ApplePaySession(
    minimalSupportedVersion,
    applePayPaymentRequest
  );

  // start Apple Pay
  applePaySession.begin();

  // Handle Apple's merchant validation request
  applePaySession.onvalidatemerchant = async (event) => {
    try {
      const paymentRequestPayload = {
        displayName: 'Visa 1233',
        validationUrl: event.validationURL,
        domainName: window.location.hostname
      };

      // The create payment product session API will handle
      // the Apple Pay server-to-server  merchant validation
      const { paymentProductSession302SpecificOutput } = await session.createPaymentProductSession(
        APPLE_PAY_PRODUCT_ID,
        paymentRequestPayload
      );

      // Complete the merchant validation by providing the merchantSession object to the ApplePaySession
      const merchantSession = JSON.parse(paymentProductSession302SpecificOutput!.sessionObject);
     applePaySession.completeMerchantValidation(merchantSession);
    } catch(error) {
      // Somehting went wrong, cancel the payment
     applePaySession.abort();
    }
  };

  applePaySession.onshippingcontactselected = (event) => {
    // Store the updated shipping details and potentially update
   // the payment by adding new line items

    const applePaySchippingContactUpdate = {
     newTotal: ``,
      newLineItems: ``,
      // other values here...
    };

   applePaySession.completeShippingContactSelection(applePayShippingContactUpdate);
  };

  applePaySession.onpaymentauthorized = (event) => {
    const token = event.payment.token;
   const status = token
      ? ApplePaySession.STATUS_SUCCESS
      : ApplePaySession.STATUS_FAILURE;

    applePaySession.completePayment(status);

    switch(status) {
      case ApplePaySession.STATUS_SUCCESS:
        // Store the payment token in the PaymentRequest
        const paymentData = token.paymentData;
        paymentRequest.setValue('encryptedPaymentData', JSON.stringify(paymentData));
        break;
      case ApplePaySession.STATUS_FAILURE:
       // No payment token means the payment failed. Let your customer know and
        // complete the payment with a failed status.
        break;
    }
  };
}
4. Preparing and sending the payment token
When your customer has finished authorising the payment in the payment sheet, you will receive the Apple Pay payment result, which contains the Apple Pay payment token. This payment token needs to be provided in the Create Payment API to complete the payment. The Create Payment API offers two options to provide the token.
- encryptedCustomerInput This is the default option for providing payment data from the client SDK. The field is normally used for providing payment details that are not already encrypted, such as plain credit card details. When you already use our JavaScript SDK to process payments on your pages, this is probably the most convenient option.
From your backend server, send a Create Payment request via our server to server API.PREPARE THE PAYMENT TOKEN
const paymentRequest = session.getPaymentRequest(); const encryptor = session.getEncryptor(); const encryptedCustomerInput = await encryptor.encrypt(paymentRequest);Create Payment{ "order" : { "amountOfMoney" : { "currencyCode" : "EUR", "amount" : 2980 }, "customer" : { "locale" : "en_US", "merchantCustomerId" : "1234", "billingAddress": { "countryCode": "NL" } } }, "encryptedCustomerInput": "<Encrypted string>"
} - mobilePaymentMethodSpecificInput.encryptedPaymentData This field can be used to send the Apple Pay payment token as obtained in the snippets above, without further processing. If you use this field, simply send the payment token to your backend server as is. When creating the payment, make sure to also provide the mobilePaymentMethodSpecificInput.paymentProductId field.
Create Payment
{
    "order" : {
        "amountOfMoney" : {
            "currencyCode" : "EUR",
            "amount" : 2980
        },
        "customer" : {
            "locale" : "en_US",
            "merchantCustomerId" : "1234",
            "billingAddress": {
                "countryCode": "NL"
            }
        }
    },
    "mobilePaymentMethodSpecificInput": {
        "encryptedPaymentData": "<Payment token>",
        "paymentProductId": 302
    }
}
Sequence diagrams
Full sequence for integrating Apple Pay by using the Apple Pay API directly.
