MyCheckout hosted payment pages
Easy integration with an excellent UX
Securely outsource payment processing with MyCheckout hosted pages. No need to handle or store customer credit card information.

What are the MyCheckout hosted payment pages
Once a customer adds items to the shopping cart and fills out the shipping and billing details, they need to choose the payment method and provide the payment details. If you decide not to touch and store the credit card details of your consumers, you can outsource your payment page to us by using MyCheckout hosted payment pages.
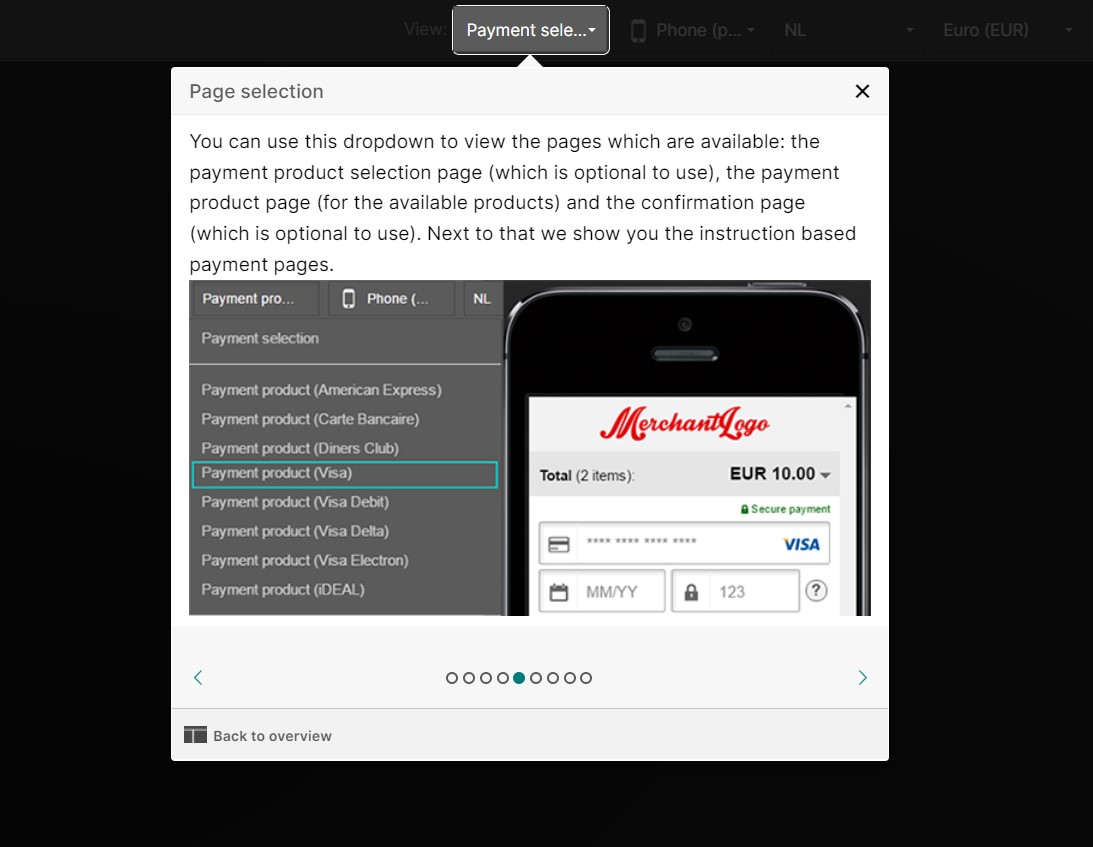
The payment method selection can be done on your site or hosted by us. Worldline hosts the payment page and takes care of building forms, validating the input, and securing your customers’ payment details. You can easily adapt the look and feel of that page in the configuration center.
Advantages of using MyCheckout hosted pages
- Page responsiveness automatically adjusts to device screen sizes
- Customize the look and feel using our online MyCheckout editor
- Compatibility with desktop, tablet, and mobile screens
- Editable text options for the payment page
- Selection of 50 languages/locales
- Integration of all Worldline platform payment products into hosted pages
Add MyCheckout hosted page to your site
- Initiate a hosted checkout via the Create hosted checkout API call (check the input details on our API reference)
- The call will return you an HTTP status 201 and a partialRedirectUrl field with the URL to redirect your customer to the checkout page. Consider the additional possibilities:
- set a custom return URL via returnUrl in HostedCheckoutSpecificInput for personalized redirection
- control display of the payment result page using showResultPage parameter in HostedCheckoutSpecificInput to either show the Worldline page or redirect customers to the return URL after payment
My look & feel
To customize the look and feel of your checkout page, first log in to the Configuration Center.
Once logged in, you can access all customization options for your MyCheckout hosted payment pages through the sidebar under Merchant settings, in the Hosted payment pages section:
Before you begin
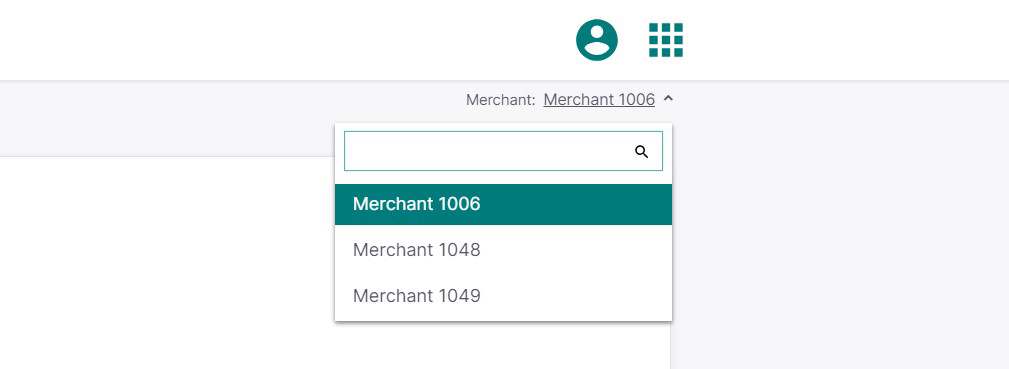
If multiple Merchant IDs are linked to your account, make sure the right one is selected before starting the hosted page customization process.
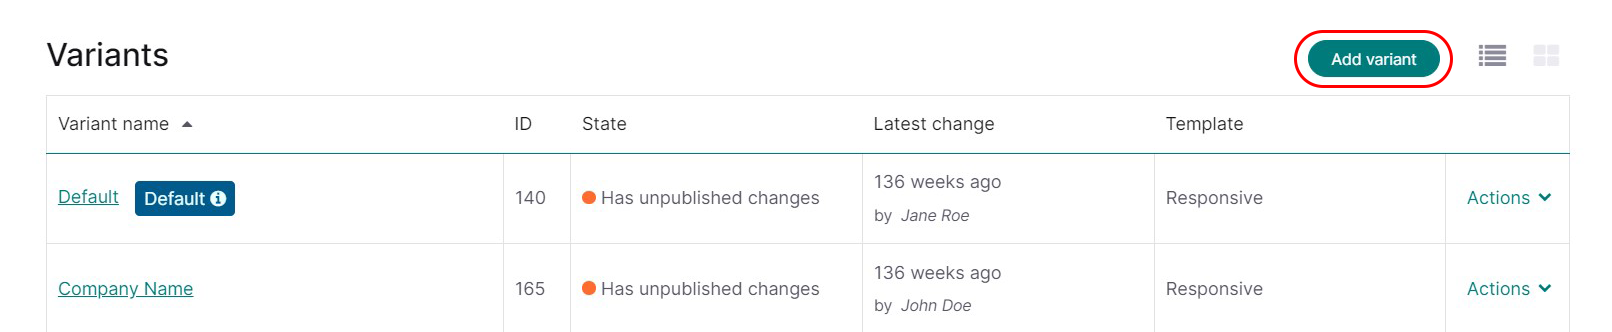
Create a new variant in the Look & feel page
To start designing your checkout page, go to Look & feel. Under the Variants section, click Add variant to create a new design variant for your payment page. (A variant is an individual version of your hosted payment page, each with its own design.)
In the appeared window, type the name of your variant and select one of the available templates:
- responsive: page adapts automatically to the screen of the consumer's device (desktop, tablet, and mobile, both in portrait and landscape mode).
- minimal (iframe): if you want to use an iframe to implement the page (offering you customization of your own preference around it), you can choose this format.
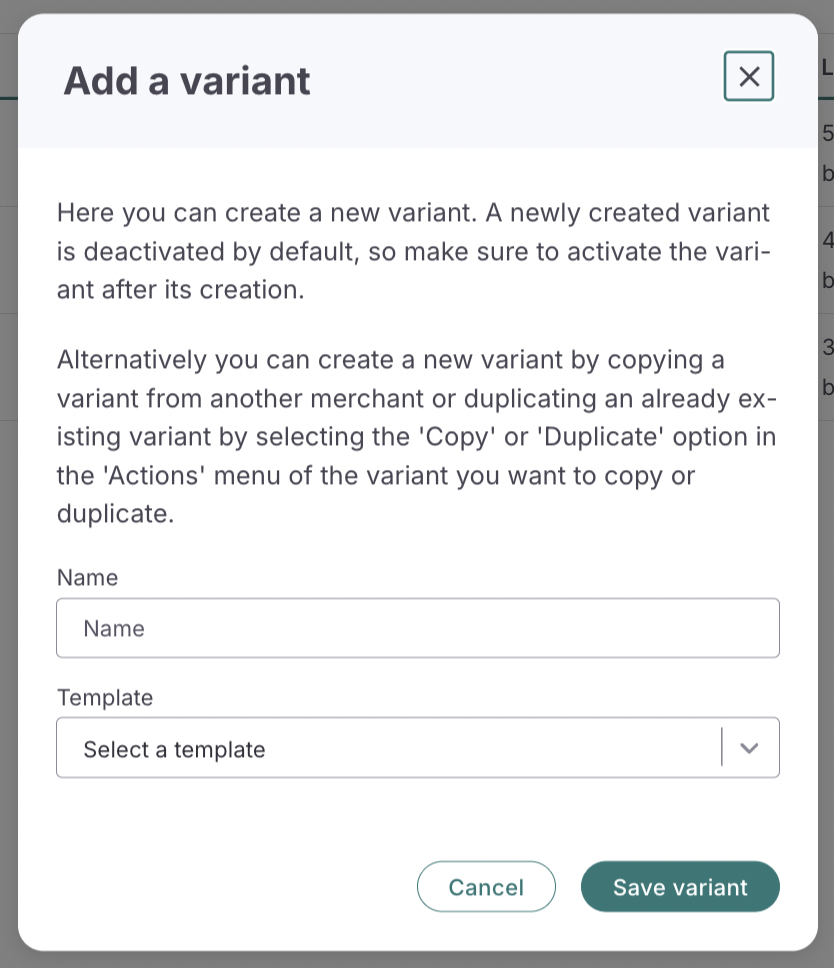
Each variant is created using one of the available templates (Responsive or Minimal). Once selected, the template cannot be changed for that variant.
If you want to use a different template, you must create a new variant based on that template.
When you press the "Save variant" button, you'll it added to the list of existing variants. Every variant includes the following information:
- Variant name - make sure to give the variant a definitive name you'll recognize later
- ID - number assigned to the variant that you need to put in the HostedCheckoutSpecificInput property of the Create hosted checkout API call
- State - the page status that can be published, has unpublished changes, and unpublished
- Latest change - when the page was altered and by whom
- Actions - the dropdown allows you to see what actions can be performed with the variant
| Edit | Enter the editor tool to design the look and feel of your payment page |
| Activate | Enable the newly created variant for editing (does not publish anything) |
| View published version | Display the page that customers currently see |
| Deactivate | Unpublish the variant so it is no longer used for customers. A deactivated variant cannot be edited until it is activated again |
| Set as default | Mark this variant as the default payment page |
| Publish changes | Make the applied changes go live |
| Rename | Change the variant name |
| Duplicate | Make a copy of the chosen variant (might be helpful for A/B testing) |
| Copy to merchants | Copy the selected variant to other merchantIDs within the same account. Changes made to the original variant will not affect the duplicated ones (and vice versa)b |
| Discard unpublished changes | Cancel the applied changes that were not published yet |
Before customizing a variant, you must activate it. This activation only enables editing, it does not publish anything to your customers. To make your changes live, you must explicitly click Save & Publish after doing your design changes in MyCheckout editor.

Edit your payment page (variant) in MyCheckout editor
The MyCheckout Editor is the tool used to customize your payment pages. Once a variant is activated, you can adjust its design directly in the editor.
The editor allows you to update elements such as the logo, background colors, images, buttons, fonts, input fields, and more, giving you full control over the visual appearance of your hosted payment pages.
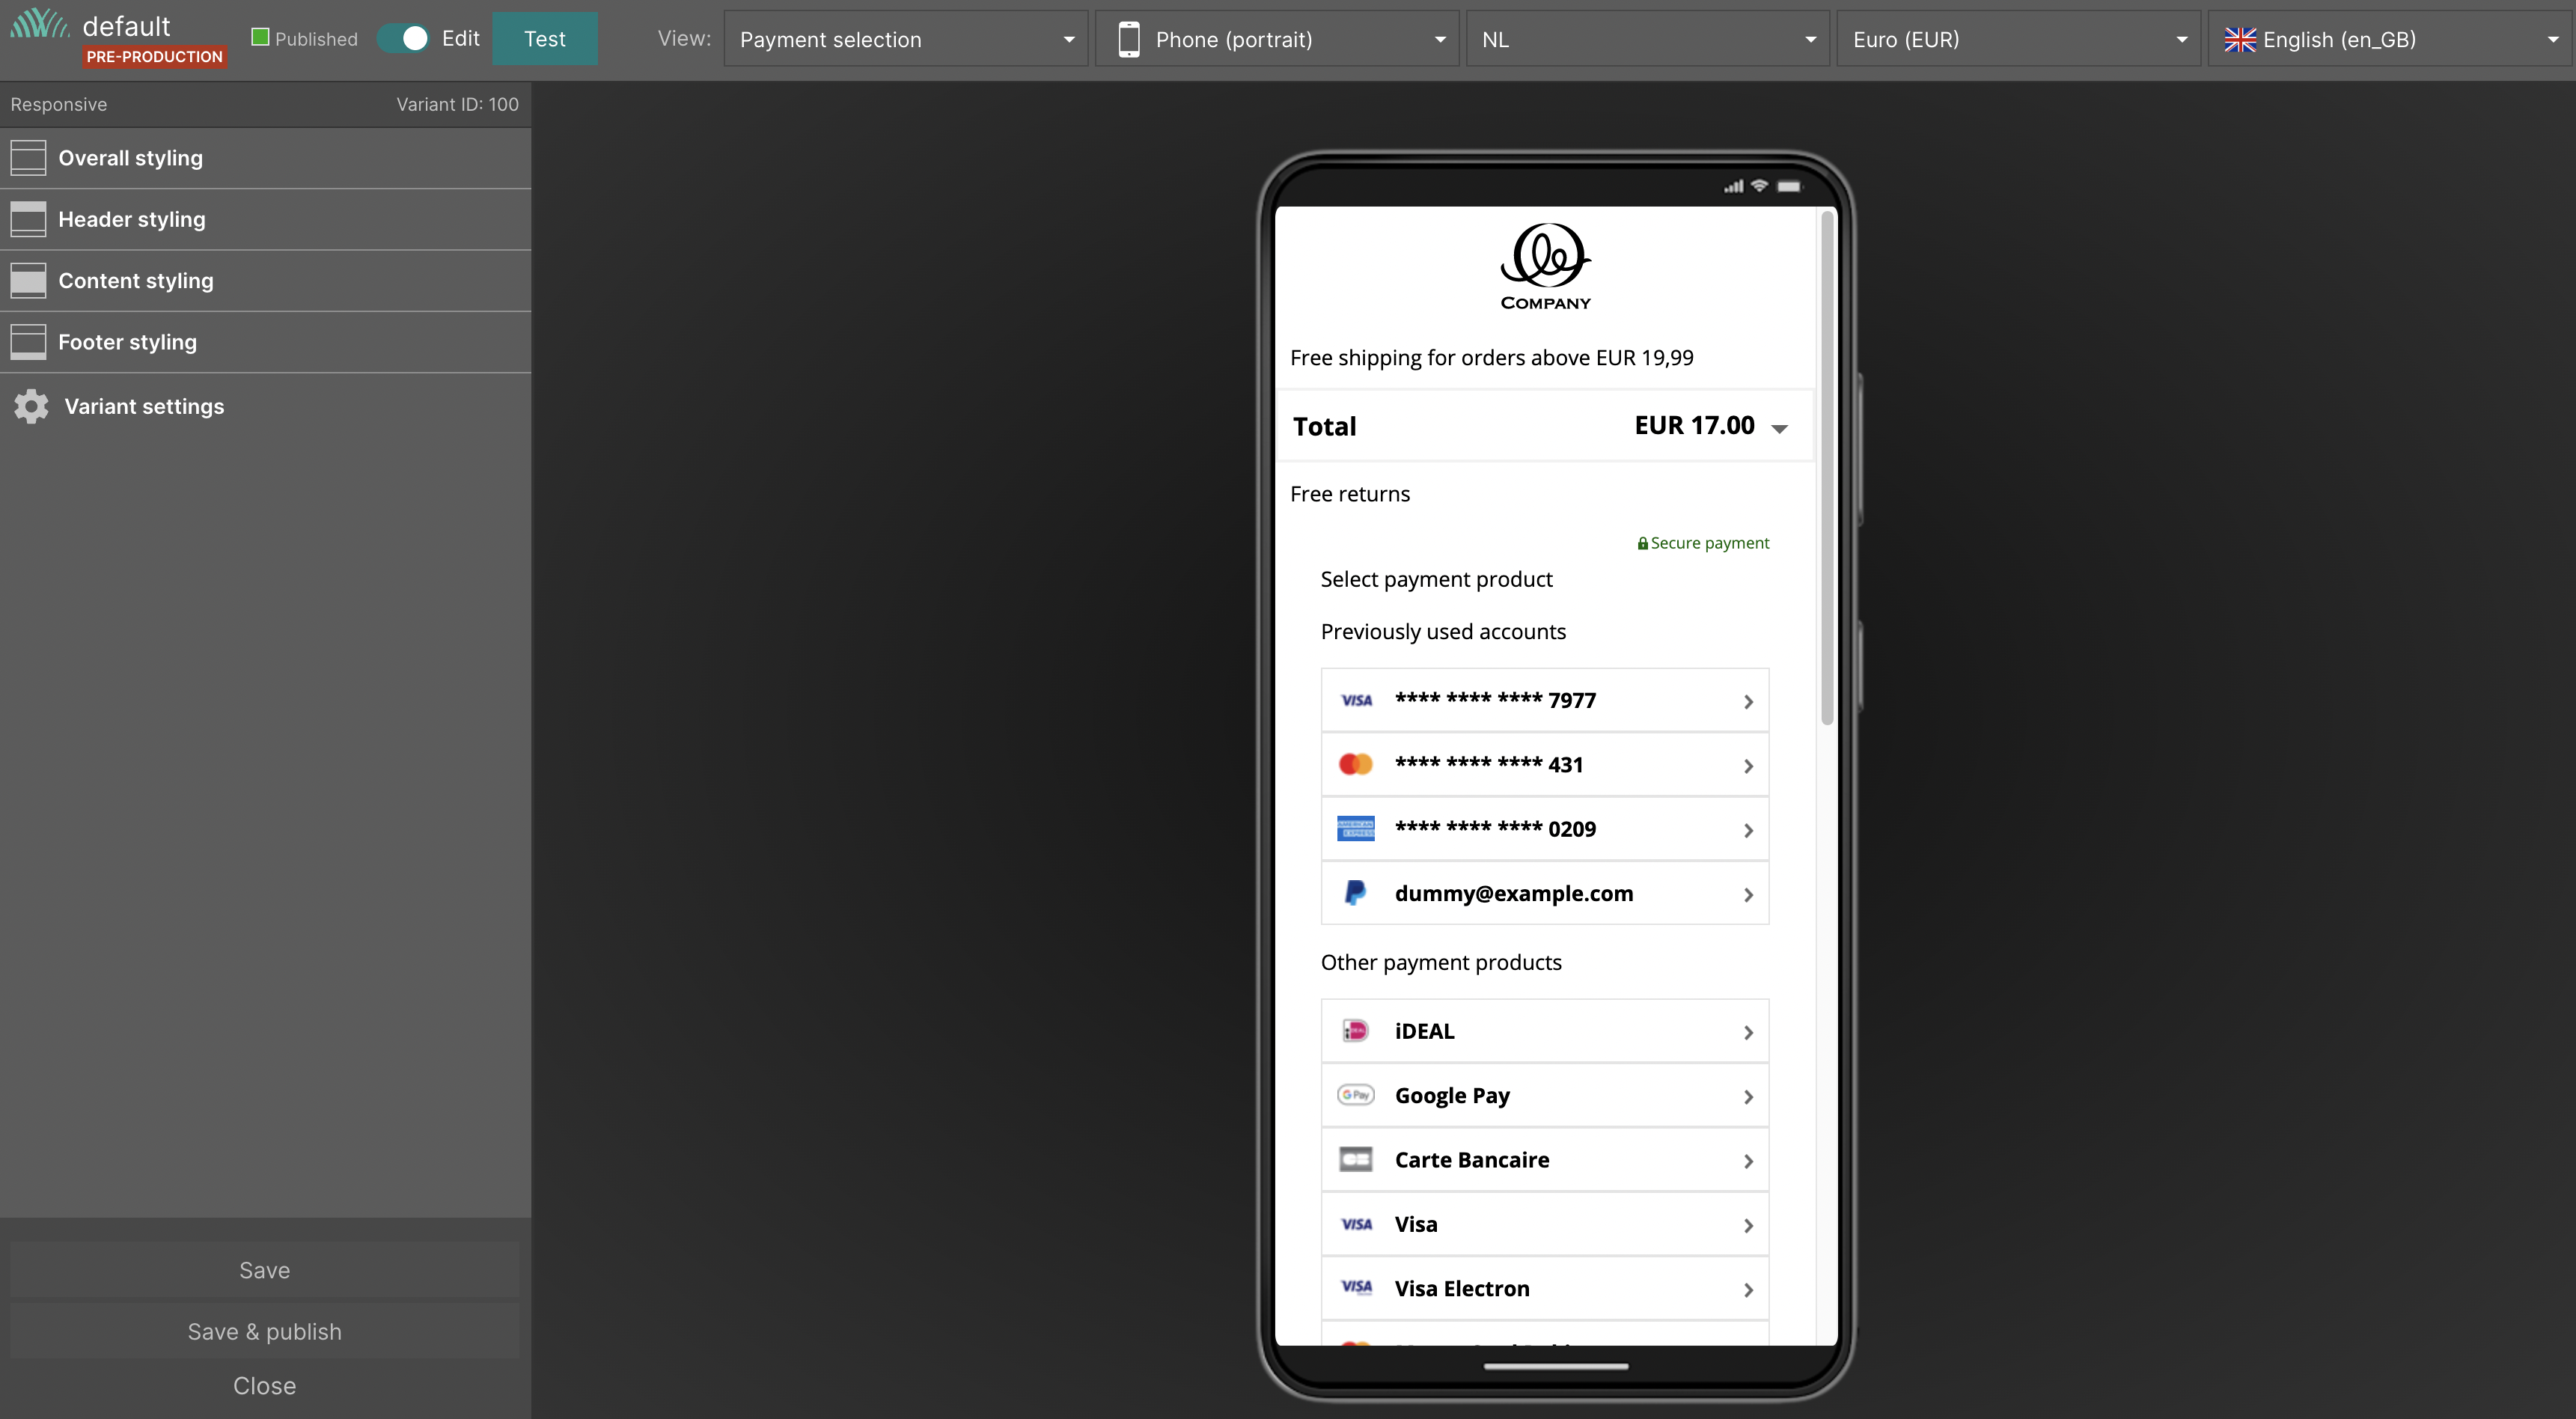
Payment products
Our MyCheckout hosted payment pages supports all payment products that the Worldline platform offers, so credit cards, wallets, bank transfer etc. Some of these products are hosted on the page itself and some require a redirect to the third party (e.g. Skrill). Products that are hosted on the page itself will follow the styling you configure in the MyCheckout editor. Redirect products will not, as their visual appearance is not handled by the Worldline platform.
Language packs
The texts shown on the MyCheckout hosted payment pages are translated into 35 languages and many more locales, so you can offer the page in the language your customers speak.
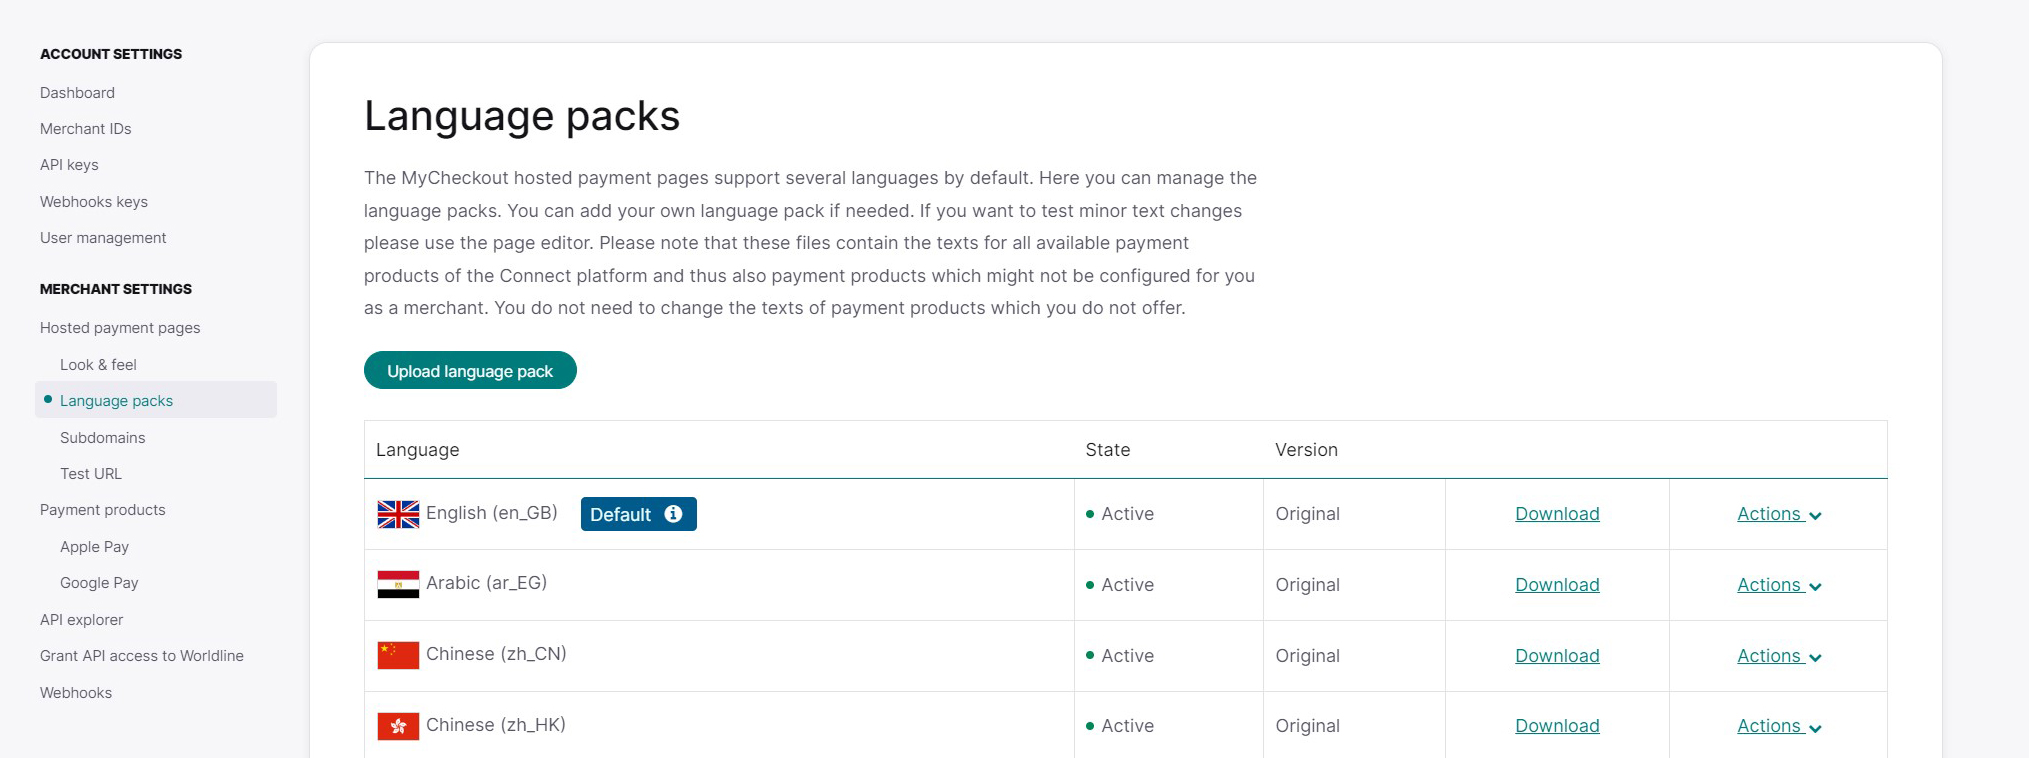
If you want to change the default text as we provide it, you have the following options:
- change the texts for all variants (use the language pack option in the Configuration Center)
- change the text for one variant (use MyCheckout editor of the payment page, which is in the "Look & Feel" section of the Configuration Center)
Change the text
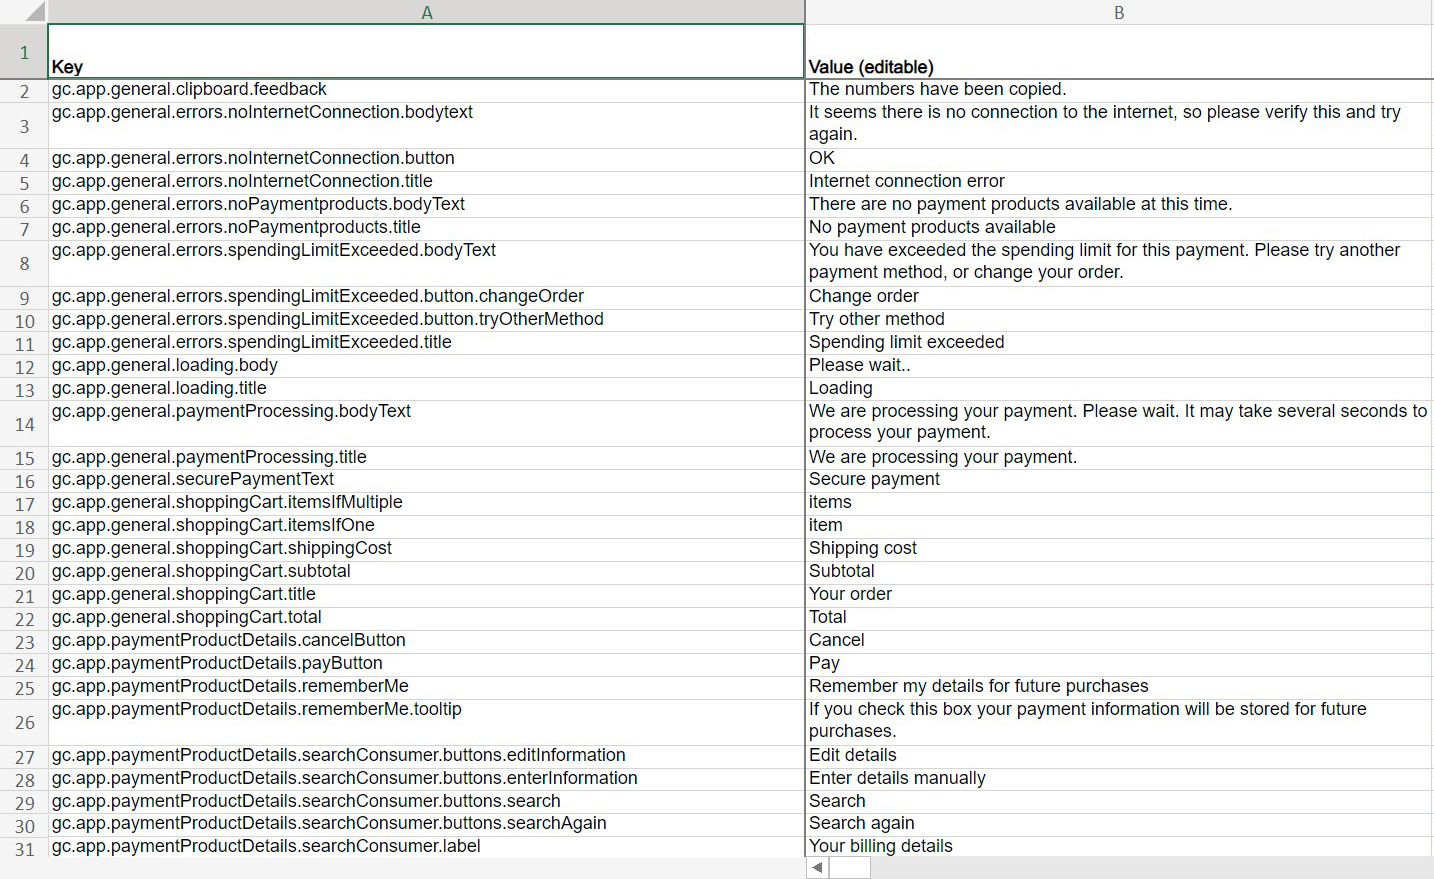
To change the language packs, you first download the default package of the language you want to change. Alter the words in the second column as the first column provides the details of which text belongs to which field on MyCheckout hosted payment pages. Once you are done, remember to save the file locally on your computer.
How to upload new language packs
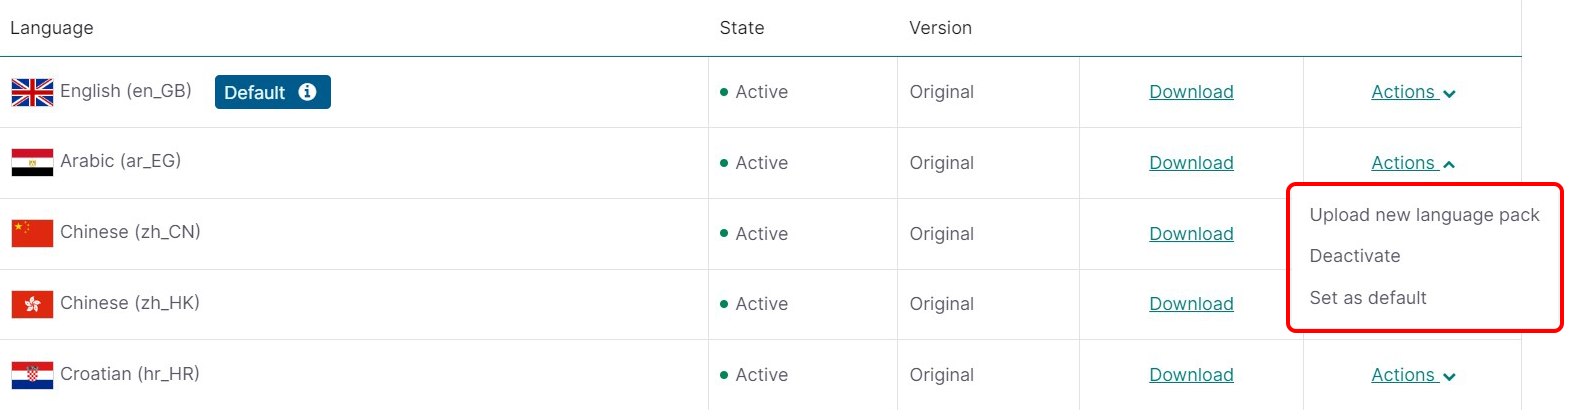
- Press the "Actions" button
- Choose the option "Upload new language pack"
- Select the language and locale
- Add the file by dropping it in the pop-up screen or upload it by clicking "click to upload"
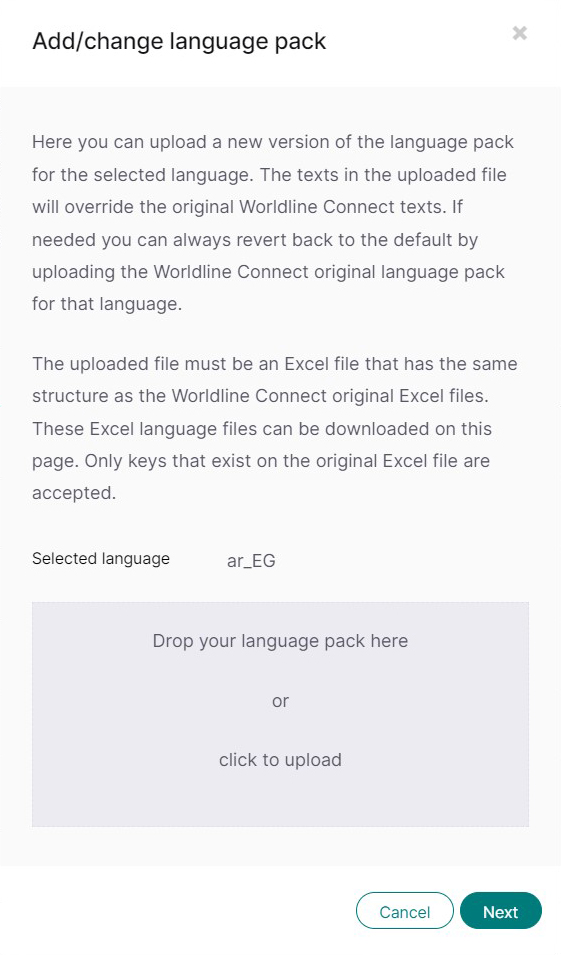
- Press the "Next" button
- We'll provide you with an overview of the language keys that have changed, and you can verify these again
- If the changes are correct, press "Yes, this is correct." If they are incorrect, you can go back or cancel the upload completely
- Your new texts are uploaded to our system and will be activated automatically after publishing
To show your customers the language of their country, you need to provide us with this info in the API. It can be done by setting the locale field in the HostedCheckoutSpecificInput field of the Create Hosted Checkout API call you use to start the hosted process for your customer.
One of the languages in the list is set as default. If you don't specify the language yourself, we'll present your customer with your chosen default language (we'll also default to this language when the locale you provide is not recognized). To deactivate a specific language, click the Actions > Deactivate.
Available languages and locales
| Language name | LanguageCode ISO 639-1 | Locale |
|---|---|---|
| Arabic | ar | EG |
| Chinese (Simplified) | zh | CN |
| Chinese (Traditional) | tc | HK |
| Croatian | hr | HR |
| Czech | cs | CZ |
| Danish | da | DK |
| Dutch | nl | NL |
| Dutch-Belgium | nl | BE |
| English | en | GB |
| English-Australia | en | AU |
| English-Canada | en | CA |
| English-Ireland | en | IE |
| English-New Zealand | en | NZ |
| English-United States | en | US |
| Estonian | et | EE |
| Farsi (Persian) | fa | IR |
| Finnish | fi | FI |
| French | fr | FR |
| French-Belgium | fr | BE |
| French-Canada | fr | CA |
| German | de | DE |
| German-Austria | de | AT |
| German-Belgium | de | BE |
| German-Switzerland | de | CH |
| Greek | el | GK |
| Hebrew | he | IL |
| Hindi | hi | IN |
| Hungarian | hu | HU |
| Italian | it | IT |
| Italian-Switzerland | it | CH |
| Japanese | ja | JP |
| Korean | ko | KR |
| Latvian | lv | LV |
| Lithuanian | lt | LT |
| Malaysian | ms | MY |
| Norwegian (Bokmal) | nb | NO |
| Polish | pl | PL |
| Portuguese-Brazil | pt | BR |
| Portuguese | pt | PT |
| Romanian | ro | RO |
| Russian | ru | RU |
| Slovak | sk | SK |
| Slovenian | sl | SL |
| Spanish | es | ES |
| Spanish-Argentina | es | AR |
| Spanish-Colombia | es | CO |
| Spanish-Mexico | es | MX |
| Swahili | sw | KE |
| Swedish | sv | SE |
| Thai | th | TH |
| Turkish | tr | TR |
| Ukrainian | uk | UA |
| Urdu | ur | PK |
| Vietnamese | vi | VN |
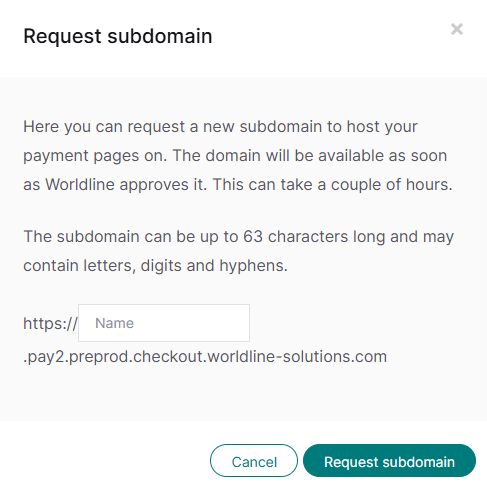
Subdomains
In this section, you control the subdomains for hosting MyCheckout payment pages. By default, we provide a handful of subdomains that are ready to go for all our clients. These are labeled as "shared" and can't be altered. The page that your customers see depends on the API key you use when making the hosted payment page URL.
If you'd like a subdomain that connects with your company's name or website, adding an extra layer of trust for your customers during payments, you can request up to 5 subdomains. Just remember these won't include the ones already marked as "shared." The main domain for the MyCheckout hosted payment pages is https://checkout.worldline-solutions.com
Adding subdomains on your own through the configuration center is simple. Just click "Request new subdomain" and enter the desired name in the pop-up window. Afterward, hit "Request subdomain," and we'll let you know if the domain gets approved.
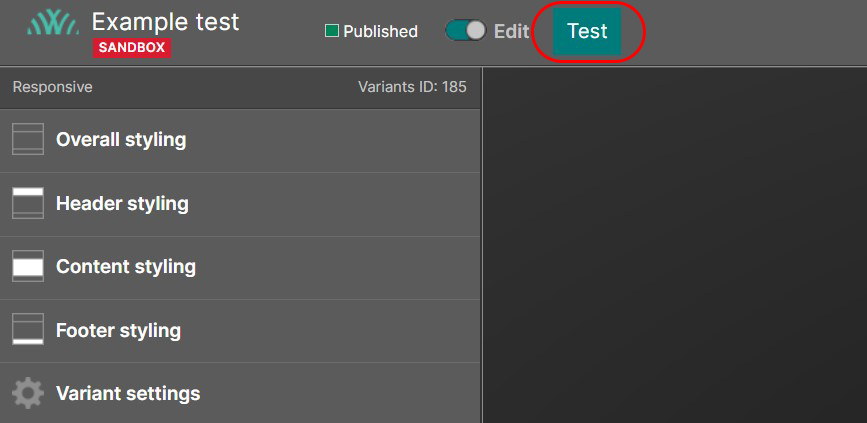
Testing your design
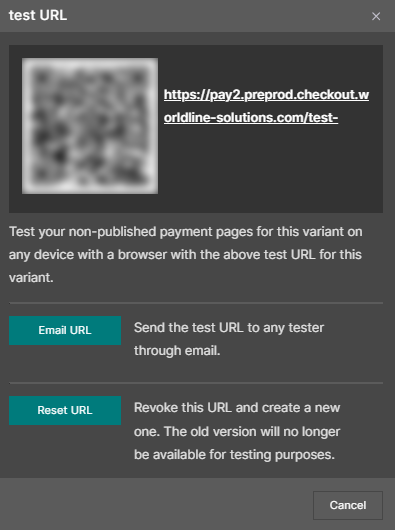
Generate test URL
The test URL is used as a starting point for your device to enter the test mode, accessible from the page editor. It can be the homepage of your website, shopping cart, or checkout page, depending on your needs. To test your design, please press the "Test" button in the MyCheckout editor.
Alternatively, you can set the test URL in the submenu of the "Merchant settings" section of the configuration center.
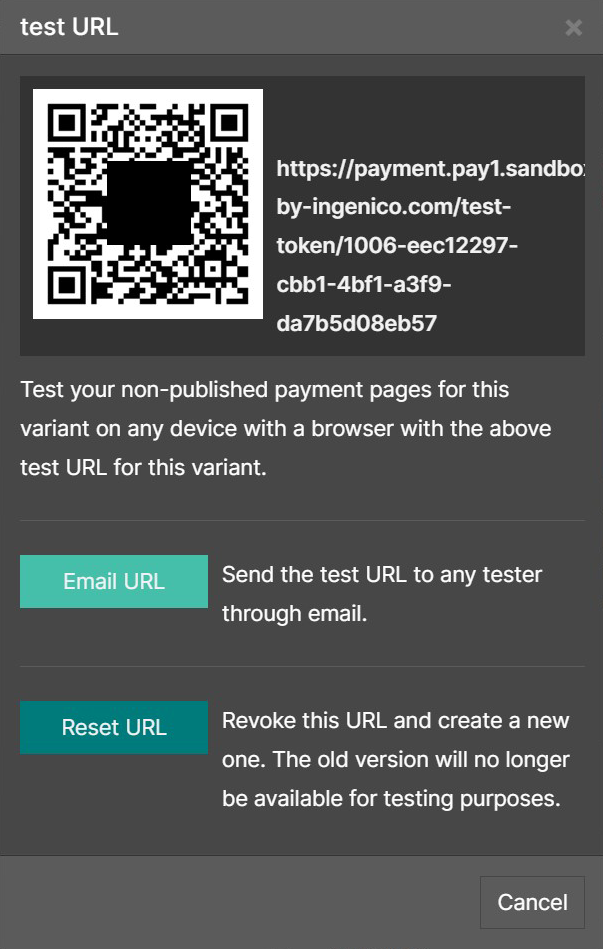
How do you start the test?
Once you have set up the test URL, you can validate your hosted payment page in your regular checkout flow. Press the "Test" button in the MyCheckout editor to do so. You can scan the QR code, copy the URL, or send it via email.
What happens once you click the test URL?
The device you used to click the test URL link is linked to a particular version of MyCheckout's hosted payment page. This means that when you perform a checkout on your sandbox website using this device, it will automatically use this specific version. This allows you to test this version in a real-world environment. Other visitors, on the other hand, will still see the currently published version that is set up by default.
To begin testing, go to your website and initiate a checkout process. Keep in mind that you'll be operating within the sandbox environment, so any orders you make will be treated as real orders.
Test mode message
Whenever you initiate a checkout, you'll see a message confirming that it's in test mode. This message will keep appearing whenever you access the checkout as long as this device is configured for testing. If you decide to close this message, it won't reappear unless you restart your browser. When you exit the test mode, the device will no longer be set to use the test version. You can easily switch it back to test mode by clicking the URL that brought you there.
Test mode end message
The person who sent you the test link can end the test anytime. If they do so and you begin a checkout, you'll see a special message. To initiate a new test, reach out to the person who originally started it, as they can provide you with a new test link. During this time, the standard published variant will be in use.
Testing multiple variants
Each test link configures your device to test a particular variant. Remember that a device can only have one test variant enabled at a time. If you wish to test multiple variants sequentially, simply click on the respective test links before starting each test. Your device will switch to the chosen test variant, and you can switch as many times as needed.
A/B testing
You can perform A/B testing by preparing different versions of your payment pages. However, please note that you must have at least two versions published simultaneously to engage in A/B testing. Afterward, you can analyze the results to make informed decisions.
To utilize A/B testing effectively, simply add the ID of the variant you want to test to the "variant" field in the HostedCheckoutSpecificInput data element within the Create Hosted Checkout API call. When you initiate a new MyCheckout hosted page session for your customers, you can specify which variant to use.
By monitoring the conversion results for a particular variant, you can conduct A/B testing with various alternatives, ranging from A and B to even C to Z if you wish. It's worth noting that you have complete flexibility in how you use this variant field. You can control it from your e-commerce system, implement a straightforward 50-50 split, base it on time or location, or employ any method that suits your needs.
Redisplaying instructions page
Certain products display payment instructions to customers towards the end of the payment process. Giving your customers the option to see those instructions again can be helpful.
With MyCheckout hosted payment pages, you get the benefit of having this feature available. It enhances the e-commerce experience by allowing customers to see the instructions again easily. It's worth noting that customers often need to refer back to the instructions after the initial payment session has ended.
- Start the redisplay process by creating a new session using the Create SessionKey Server API call.
- The API call will return you clientSessionId.
- With the initial Server API response for CreatePaymentRequest or CreateHostedCheckout you received (for an instructions type payment product) a text return value in the CreatedPaymentDetails field named instructionsRenderingData.
As a merchant, you should store this exact value in your order history for the customer as you need it to redisplay the instructions.
- Using the newly created clientSessionId and the instructionsRenderingData, post to the /instructions endpoint of the API in the /instructions/
/ / format. In addition to the instructionsRenderingData, you can optionally provide a locale and variant if you want to use A/B testing here. If you don't specify it, the defaults will be used.
Feel free to redisplay the instructions page whenever needed: there's no limit to how many times you can do this, as long as you have the instructionsRenderingData saved in your system.
If you modify the appearance of MyCheckout hosted payment pages through the Configuration Center, the way the instructions are shown will change in looks. However, the financial information will stay the same as when the payment was made. It's important to remember that the instructions redisplay adjusts well to different devices like smartphones and tablets, providing a smooth experience.